Thursday 26 July 2012

Pen Tool in Coreldraw

Pen Tool is a key tool to design abstracts logos, patterns, etc. Here in this tutorials we will know that how can we use Pen Tool in CorelDraw. Below is an Video Tutorial for this tool please check it before starting the lesson.


Pen Tool in Corel

Introduction:
Pen tool is almost available in each and every design application whether it is Ps, Ai, etc.. It uses same button symbol in all packages like Adobe, Micromedia, Corel, etc..

Drawing a Straight Line with Pen Tool:
Select the pen tool and click where you want to start line then left-click where you want to end it. Check video tutorial for reference.

Drawing a Curve Line with Pen Tool:
Select the tool and click where you want to start the curve now click and click where you want to end it. Now edit the curve using different options given with pen tool.
You can also curve a line just holding the left-click before second click and dragging your mouse to give a better look to your curve line.

How it works:
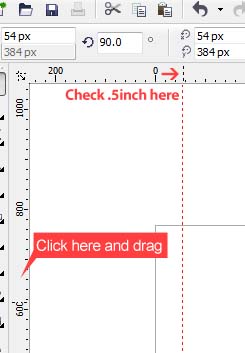
Here in the below image, I have explained Pen Tool that how it's force works. Please use your mind and understand the way Pen Tool Force.

Waiting for your comments..

Tuesday 24 July 2012

Filters in Microsoft Locstudio

Microsoft Locstudio is preferred for Windows Localisation. In this article you will know about Filters in MS Locstudio. You will know:

  • What is filter?
  • How they work?
  • Can we create our own filter?
  • How to edit a filer?
Filter in Locstudio is same like the filter in MS Excel. There is not any different between both. You can select anything to work or can hide what you do not work on.
In translation when a client share any project then he/she always gives filters to Project Manger or translator. In that he/she do hide some part of source that is not for translation. Same you can do with excel. But there is one difference between LocStudio and Excel that excel don't have TM (Translation Memory) but Locstudio have.

WHAT IS FILTER: Filter in Locstudio is same as filter work in Excel. You can hide repetition or any part of source which is not for translation.
HOW THEY WORK: We install the filter in Locstudio and then apply them on source. They automatically change the source and translation file and make it ready for translation.
CAN WE CREATE OUR OWN FILTER: Yes, absolutely we can create. For that we need to customize our translation window and then save these settings as filter.
HOW TO EDIT A FILTER: You can easily edit a filter in Locstudio.

Thursday 19 July 2012

MS Word Manual Page Numbering

If you want to start page numbering from page 2, and want 2 on second page then you need to create a different page section and need to change page numbering format. To know more read this article...

For MS Word 2003 :

Go to Insert bar and click on Page Numbers
Change the alignment of Page Number
Unclick to Show number on first page

Now, click on Format Option
Change here start at for 2 or 3, anything you want to start.
You can also continuous numbering from page one.

Change the settings and see the result. Set it as you want. I hope you are done.

For MS Word 2007 & 2010:

Go to Page Layout and open the options.
Now, change the Left-bottom option and start your page numbering as you want.
You need to divide your document in sections if you want a different page number starting in a single document.

If you have any problem doing this then contact me for assistance. Thanks for your time.

Sunday 15 July 2012

Importing Files in CorelDraw

We can import any files and objects like; .doc, .psd, .jpeg, .png, .tiff, .ai, .txt, .etc... in Corel. For that we need to follow some steps:::
To import any thing in Corel we need to Press import command that is Ctrl+I (Control + Import). Now we need to browse the file. Select the file and open it.
There are different types of files where we need to do some setting while importing, here in this post i'm describing most usable formats...

Importing a .txt and .doc file

We can import a multi-pages word document in corel draw with styles and formatting. We just need to do some setting for that. We need to maintain the styles and font and formatting while importing the document.


Importing a .pdf file

Click ctrl+I to open Import. Now, select your file and click import. Import PDF window will show to you, there you need to do some changes.
(Sometimes we have a pdf file and want to change few text or edit objects on it. This is the better way to open that in Corel and do the changes.)
Import Text as: There are two option if you select the Text then you can edit the text or if you choose Curve the whole text would be curved and you can not edit that.
Pages Selection: If you want to import any selected single page then you can type in second option (Select Pages) or if you want to open all publication then select all pages.


Importing an .EPS file

While importing an .eps file in Corel we need to do some settings on Import EPS Window and that is given below:
Change Import Options to:
Import as Editable
Import Text as Curve
Don't need to change else.
Now press OK.


Importing an AutoCAD File

You can also import a CAD file in Corel for that you need to do:
3D Projection : Top
Units : Metric, 1unit = 1mm
Scaling: 1:100
Then press OK.

This support is not familiar with beginners, but it will help them in future. If you know anything to add here which can help the DTPiers to work smartly with CorelDraw you can write in comment option. I'm waiting for your valuable feedback. 
Thanks for your time. Read next to know more about Corel.

Thursday 12 July 2012

Creating a New Document in CorelDraw

CorelDraw is a unique desktop publishing software, with this you can design anything you want for print and design. Here we start with a new document, this is very first tutorial to teach you about creating a CDR file. You should practice it while reading the tutorial. Open your software and start doing this. 

Step 01:
Open the software does not matter which version you are using (12 13 14 15). Now go to
File > New or press Ctrl+N to create a new document.
Name: Give a file name as you want. Give a proper name that you can recognize it by it’s name.
Preset destination: Remain it custom or if you working for web projects change it to Web.
Size: There are different sizes you can use. Choose according to your need or let it Full Screen.
Width: Set width of document, you can change the units to inch or points.
Height: Set height as you want.
Rendering resolution: Let it default.
Do not change the color settings.

Now, press OK and a blank document will show to you.

Step 02:
Time to setup a margin for the document.
Margin : We leave some space on the top, bottom, right and left of the page. Normally we leave .5inch margin on each side. 
Click on the ruler (shown in the image below) and drag a guideline for margin. Give .5inch margin on each side. 
Setting-up guidelines for Margin
You can also customize page size here.
  

Save your document and choose a better location for future.
Now, our layout is ready. Time to put text, objects, images on it.

Time to see step 02 for this…