Monday 26 November 2012

ABCD Chart for Kids


Hi! This is Sumit, a freelance graphic designer. I designed this chart for small kids who don't know small-alphabets. The kiddish font and colorful illustrations making it attractive for kindergarten. For high resolution images for ABCD Chart and PDF or PNG file please contact us to mediasixteen@gmail.com...


Children will love these illustrations. Here I have uploaded all the vector designs. I have used very funny and colorful images for all alphabets like apple, ball, chair, door, egg, fish, girl, hat, ice, jug, kite, leaf, moon, net, oat, pencil, quilt, robot, star, tap, umbrella, vase, watch, x-ray, yo-yo and zip for z. All photos background is fully colored according to theme of the object. 


As you can see that the gradient background for Kite adding extra beauty to the design. You can also see the Moon's background there are night seen of sky showing some stars around alphabet. If you are looking for a Alphabet chart specifically designed for you then come to us we will make your imagination true. We are a design studios specialized in children books & illustrations. We design creative rhyme books and stickers. We also provide printing services all over the world. So, if you are looking for cheap and attractive ABCD Charts from India then call to us... 
Thanks for your time. 

Size of the ABCD Chart is 12"x18" (inch) and it is printed on 300 GSM Art Paper. If you want this printed for your kid then contact me at +91 9760829608 or mail at mediasixteen@gmail.com

CLICK HERE TO BUY ABCD CHARTS

Panorama View Technology

Today I was checking a website of Jaypee Hotel Masourrie and it was great to see the Images in Panorama View. Here you can also check click to see.

It was great to see 360 degree view of photographs. We can see whatever we want to see, every detail of the picture or site was so clear. It was adding a smashing creativity to the website. And I know the users will feeling so great to see where they will stay and enjoy their life. 

Then, I next moved to Wikipedia and starting to know more about this view. Wikipedia says "Panoramic photography is a technique of photography, using specialized equipment or software, that captures images with elongated fields of view. It is sometimes known as wide format photography. The term has also been applied to a photograph that is cropped to a relatively wide aspect ratio. While there is no formal division between "wide-angle" and "panoramic" photography, "wide-angle" normally refers to a type of lens, but using this lens type does not necessarily make an image a panorama. An image made with an ultra wide-angle fisheye lenscovering the normal film frame of 1:1.33 is not automatically considered to be a panorama. An image showing a field of view approximating, or greater than, that of the human eye – about 160° by 75° – may be termed panoramic. This generally means it has an aspect ratio of 2:1 or larger, the image being at least twice as wide as it is high. The resulting images take the form of a wide strip. Some panoramic images have aspect ratios of 4:1 and sometimes 10:1, covering fields of view of up to 360 degrees. Both the aspect ratio and coverage of field are important factors in defining a true panoramic image."

I started to exploring more examples for this, it was great to view this kind of images. The next question was how to create it?
I found a website "http://gardengnomesoftware.com/pano2vr.php" and there was a software called "Pano2VR" to create this view. 

Check the website and know more about this technology. It is great to create a portfolio with this technology. Thanks "Pano2VR Team" to create this software...

Copy the downloading link from that website:
http://gardengnomesoftware.com/pano2vr_download.php

Thursday 8 November 2012

Freelance Graphic Designer | Sumit Pundeer


“Dream comes true” it is true. Hi, my friends this is Sumit Pundeer. I had a dream to work from home as a Freelance Graphic Designer. I hate busy cities, I always wanted to work freely. My mentality was affected by a studio of Delhi, Henu Art Studio. It was great to work with Henu Ma’am. She is a great BOSS you can ever work with. There was freedom in working, we were producing high quality of creative work and enjoying life. I wanted to be like her, a good boss.
Today, I have my own setup at my home. I am enjoying working from home. Working with my family. I have a small lab where I have 3 computers, printer, scanner, fax, broadband. It was hard to find work when I started. But, I worked hard, did some telemarketing, SEO of my portfolio, etc.. I concentrated on the quality not quantity of work. Today I have a good line of clients. I have been working with great resources. All my resources are talented and creative.
If you also want to work from home then start today, it is difficult but most interesting to be you OWN BOSS. If you want my help to finding work online, then contact me. I will be great if I can help you…
Thanks for your time!!!

Tuesday 6 November 2012

Feather Radius for Cut-Outs in Photoshop

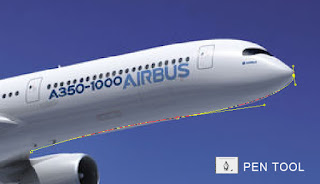
So, now you know Pen Tool, know how to work with Layers and it's time for Feather Radius. Feather Radius is also an interesting tool of PS. We use this when we want to create a transparent object. We call it Cut-Out in publishing line. Means we want to remove background and want Aeroplane (see image below).

Now, we will find out that how can we use Feather Radius for better designs. For that we open any image or photograph in PS and make a selection with the Pen tool.


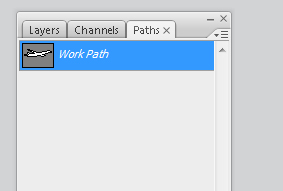
After completing selection we go to Path Panel (showing in the image below) and right click on the path.


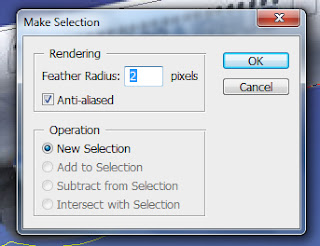
Now we click on the Make Selection and we get Make Selection Window as shown in the image below. Here we set the radius of selection. Now click OK and your selection is done.


All is done, now time to copy this object and paste in different file. You have save this file in default format as .psd or save in different format too as .png, .tiff, .jpeg, etc..

There might be some difficulties doing this. And please if you have any problem doing this then write your problem/issue/error in comment and I will create a tutorial especially for you.

Thanks for your time…

I have created this background (Cloud design for World Monuments Collage) by using Photoshop's Cut-Out method. Share your designs...